Showing posts with label Main Dishes. Show all posts

Monday, April 29, 2013

Hot Diggity Dog Corn Muffins (a.k.a. corn dog muffins!)

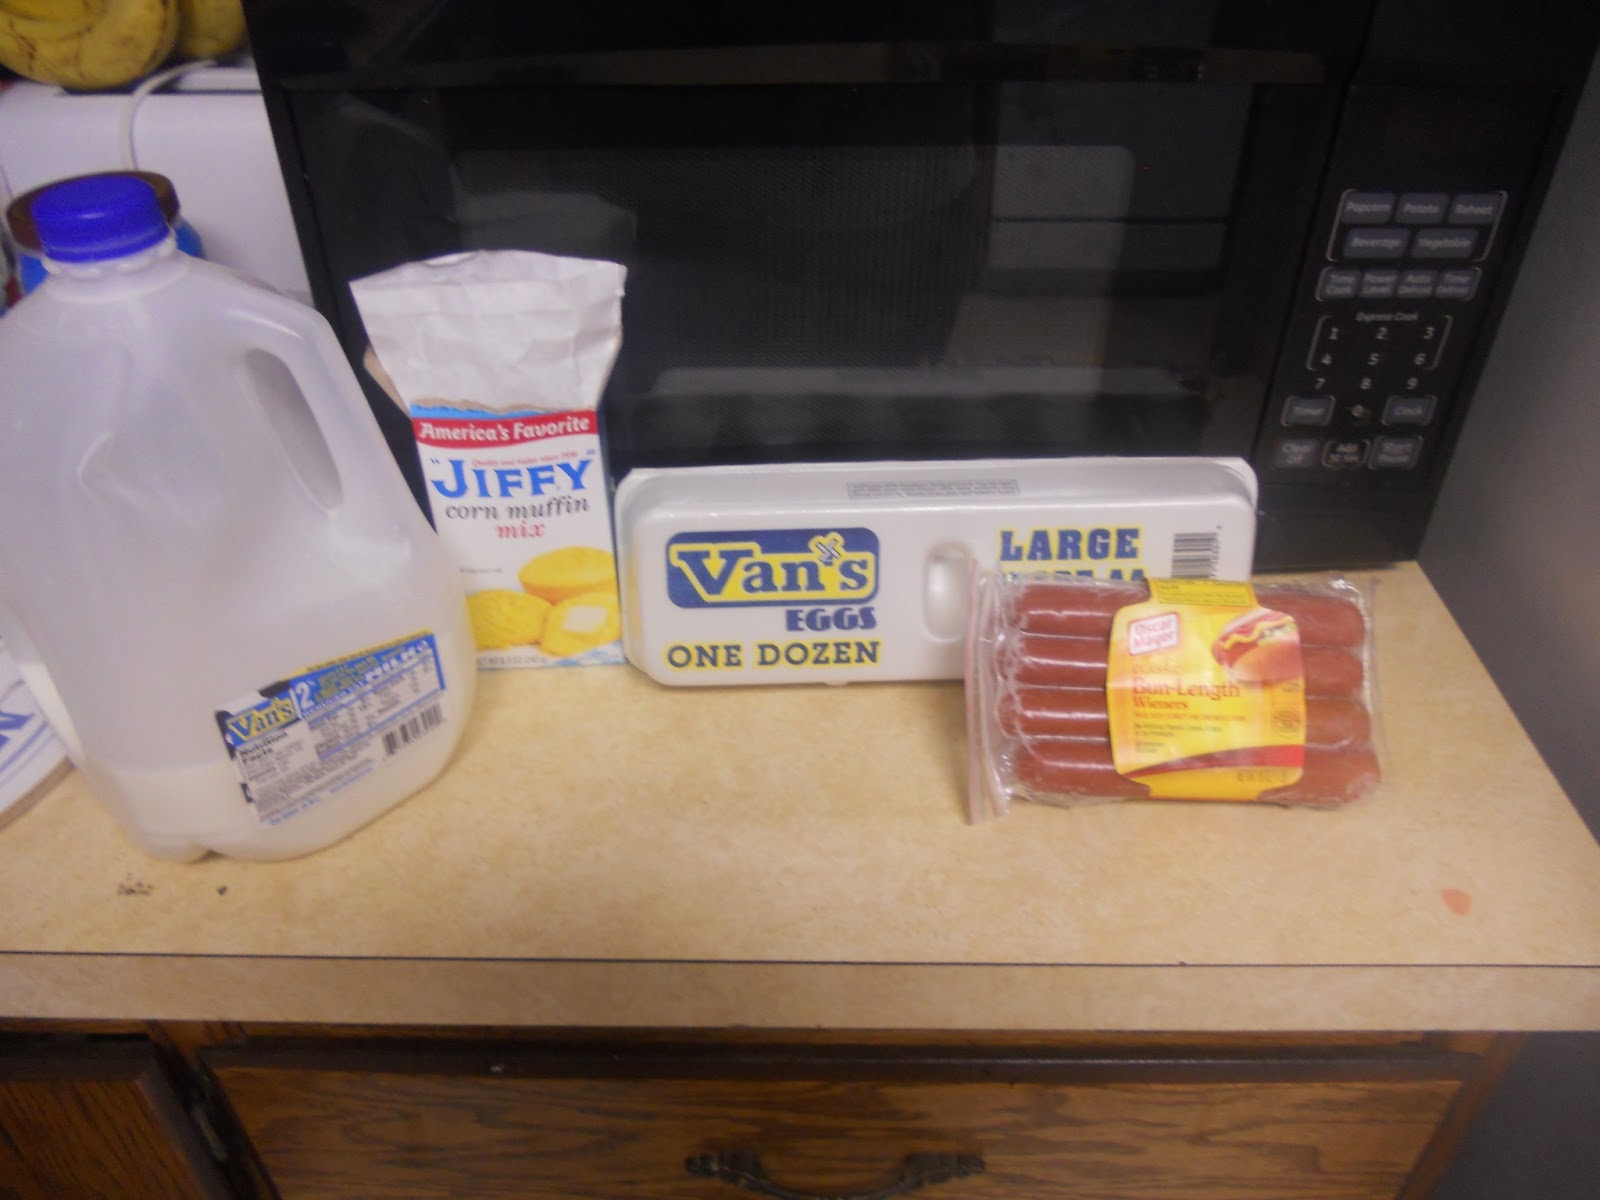
So I live in a household of males who are hot dog eating machines!  I blame our German heritage, you put any sort of grounded meat in a casing and I bet my boys will eat them!  My big boy (husband) wants a snack, he reaches for a hot dog, whenever lil man (Jasper) won't eat, I cut up a hot dog and he is licking the plate clean.  Well, this mommy gets sick of eating just regular plain hot dogs all the time.  (Don't get me wrong, I do love me some hot dogs, but just need a break!) Tonight though I think I found a recipe to help with the boring hot dog meals we eat.  I am calling them Hot Diggity Dog Corn Muffins, because my lil man starting doing "The Hot Dog Dance" while eating them.  Those with a toddler in their lives will know what I am talking about!!! These would be great for a birthday party or even an adult party (make them in a mini muffin tin).  Tonight I served them with strawberries (another staple in our household!) and LaLa (what my son calls chocolate milk!).


Hot Diggity Dog Corn Muffins (6 regular sized muffins)

1- package of Jiffy Corn muffin Mix ~or if you have a favorite corn bread recipe, use it!  I don't have one :(
1/3-cup of milk  ~if using Jiffy~
1- egg ~if using Jiffy~
3- hot dogs, sliced ~I use Oscar Meyer Bun Length dogs and cut them lengthwise then slice them into bite       size pieces!

1.  Preheat oven as to the directions for your muffin recipe.  Mine was 400 degrees and spray your muffin tin!

2.  Mix muffin mix and let it sit for 5 minutes.  I do this will all my corn bread recipes, it helps re-hydrate the corn in the mix!

3.  Slice up your hot dogs.

4.  Put some mix in tin, put hot dog slices in, then top with rest of mixture.

5.  Cook for 14-17 minutes (also depending on your muffin recipe), Cool for 5 minutes and serve with ketchup and mustard and ENJOY!!


Sunday, April 28, 2013

Sweet and Sour Chicken

This has been a very interesting day for weather here in Dillon!  Woke up to almost black, cloudy sky, then it all cleared away to beautiful blue skies, so we took the lil man out for a bike ride and and then the wind nearly blew us away.  Now, after dinner we have the perfect spring evening!

This was a very productive weekend for the Johnson household.  I spring cleaned the kitchen and living room and started on the laundry room, then I hurt my back again :(.  I am hoping this week I can finish unpacking our house (it has been since January) and sort through lil man's clothes (again!).  I have one more assignment along with my final for this class then I am down to two more classes then I graduate with my Master's in Library Media Sciences from the University of West Alabama! Go Tigers!

Anywho!  Tonight for dinner we have found another yummy recipe.  I cannot remember where I found and I am sorry.  It is a great Sweet and Sour Chicken recipe.  It is one of my favorite takeout meals and this recipe is easy, inexpensive, and delish!  I had everything except for the chicken in my pantry!

Sweet and Sour Chicken

3- Chicken breasts, cut into bite size pieces (I only used two because they were HUGE!)
2- teaspoon Kosher Salt
1- teaspoon Black Pepper
1-cup Corn Starch
2- Large eggs beaten

1.  Mix salt and pepper with the corn starch.  Dip chicken in the corn starch to coat then dip in egg.

2.  Place chicken in fry pan with heated oil.  Cook chicken thoroughly.  Place on paper towels to drain the oil.


Sweet and Sour Sauce

3/4- cup white sugar
4 - Tablespoons of Ketchup
1/2- cup Distilled White Vinegar
1- Tablespoon of Soy Sauce
1- Teaspoon Salt
1/2- Teaspoon Garlic Salt

1.  Mix everything together in small sauce pan.  Bring to a boil and let boil for 10 minutes.

2.  You can toss the chicken and sauce together or just drizzled the sauce over the chicken!!! Enjoy!

** The recipe calls for the chicken and sauce be cooked together in a 350 degree oven for an hour.  I did not want the sauce in every piece of chicken since I have the Lil Man eating with us, but I think it would taste good and will be a thicker sauce! Let me know how it goes if you go it this way!!**

Enjoy!!!

Thursday, February 2, 2012

Beef and Rice Casserole!!!!

So here I am. Back again to share some yumminess!!! Since the new year, I began grad school!! I know many people who have done this (ie my husband 3 times ;D) so I decided it was my time. So needless to say my spare time is nonexistence. Now most of my recipes will short quick and to the point or recipes that I can put in the Crockpot in the morning and forget about it until dinner time!! Besides grad school, baby, housework, and husband, I am trying to lose at least 50 pounds by my birthday in December. Lots going on, so let's see if I can do it!!!!
A new casserole that I found that sounded kind of gross when I first read it, butit was one of the best things I had ever tasted!!! It was called Beef and Rice Casserole.

3 cups of cooked white rice (I used long grain and cooked it in my rice cooker, gave it a neat sticky texture, but you can use the minute stuff if you want)

1 lb of ground beef

1/2 medium yellow onion, diced

1 can of tomato soup (YES TOMATO SOUP, I like Campbell's)

Garlic Salt to taste

Chili powder to taste

2-3 cups of shredded Cheddar Cheese (I like medium cheddar)

1. Preheat oven to 400 degrees.

2. In a pan, put a very lil amount of oil (just enough to sweat some onions). Sweat your onions and season with with garlic salt and chili powder. Add and brown hamburger. Then add the soup to the meat and warm.

3. In a 2 qt. casserole dish, put a layer of rice on the bottom, then meat mixture. On top of meat mixture add cheese. Repeat another layer. Top with cheese and bake for 20 minutes.

4. Serve with some yummy veggies or salad and ENJOY!!!!

Next time I make this I want to add some green bell peppers to the meat mixture. My hubby loved it so much that he had it for lunch and was upset that there was not any left when he got home.

Tuesday, January 24, 2012

Porcupine Meatballs

When I was growing up, my mommy dearest would make the most wonderful, amazing meatballs.  I loved them!  They were huge and full of rice and covered in a tomato-y sauce.  I thought she spent hours on these things, she had to have, they were so tasty!

I grew older (not up), moved out and kind of forgot about them.  As I was working on my own recipe book, I remembered those delectable meatballs.  I asked my mom for the recipe, thinking it would be for special occasions or weekends when I had some time to spend in the kitchen.  How did I not ask her about these sooner?  They are so easy!  Now they are a regular staple for the boys and I to enjoy.  They are still incredibly special but can be made any day of the week.

Porcupine Meat Balls

1.5-2lbs  Ground Beef or Ground Turkey
2 eggs
1c. Instant Rice (white or brown)
1/3c. Water
1 clove Minced Garlic (or 1/2 tsp. garlic powder)
Salt and Pepper

1-2 cans Tomato Sauce (depending on how much sauce you like)

Mix all ingredients (minus the Tomato Sauce) together and form into balls.  Depending on the fat content of the meat, you may need to alter the amount of water.  You want the mixture to be wet (the rice will soak up a lot of the moisture)  but it needs to be able to form into fist-ish sized balls.  Place in deep baking pan about an inch apart.

Bake at 375 for 10-20 minutes.  Once the meatballs have a decent crust on them, pour the Tomato Sauce over the meatballs and bake until done.  About 20 more minutes.

I usually serve these with more rice on the side and some yummy veggies.  So tasty!

Monday, October 17, 2011

Aromatic Noodles with Lime-Peanut Sauce

A friend of mine made this dish for me a few years ago.  The first time I tasted it, I was in love!  The flavor of this dish is bold in just the right ways and subtle in just the right ways.  It is a Thai peanut pasta with pea pods and broccoli.  Once we tried it, we couldn't get enough of it.  Sometimes in this type of recipe, the peanut butter flavor, though adored in my house on a sandwich or in a milkshake, is too much to take.  The sweetness of the peanut butter is balanced nicely with rice vinegar and lime juice.  The heat of the dish can be controlled simply by adding or subtracting red pepper flakes and ginger.  (Note: as the dish sits, the spiciness will increase)

I have made this for the boys, my sister and BIL and my in-laws, all with raging success.  As with every recipe, I alter it slightly with each time I prepare it.  Yesterday, I think I found a solid version that I will make again.

The RECIPE (as published):
12 ounces Spinach Linguine or Whole Wheat Spaghetti
2c. Broccoli Florets
2c. Snow Peas
2c. Sugar Snap Peas
1/2c. Unsalted peanuts
1/2c. Creamy Peanut Butter
1/4c. Low-Sodium Soy Sauce
1/4c. Water
2T. Rice Vinegar
2T. Fresh Lime Juice
1 Scallion
One 3/4 inch piece Fresh Ginger, peeled and grated
2T. Brown Sugar, firmly packed
1/4 t. Red Pepper Flakes (or more to taste)

Cook the pasta as directed. Drain and rinse with cold water.
While the pasta is cooking, steam broccoli for three minutes.  Add pea pods and steam an additional 2 minutes or until vegetables are crisp-tender.
Toast the peanuts in a small dry skillet over medium-high heat until fragrant.  3-5 minutes, stirring frequently.
Make the sauce by pureeing the remaining ingredients in a food processor until smooth.
RIGHT BEFORE SERVING, toss pasta, vegetables and sauce together.  Sprinkle the peanuts on top and serve.

MY CHANGES:
As much as I love spinach linguine, it was very difficult to get everything mixed up well enough with the longer pastas.  I recommend a shorter noodle, such as a penne or ziti.  I did a mixture (as that was what my pantry dictated) of whole wheat penne and mini fusili.  They worked great.

I also only used sugar snap peas.  I tried it using the snow peas a couple of times and the pods broke apart and it looked messy.  I substituted the snow peas with regular frozen petite peas.  It worked out so much better.

I definitely suggest going with the low sodium soy sauce.  Not only is it healthier, but with all the flavors in this dish, the saltiness of the soy sauce would really mess up the balance, I think.


The best part of this recipe is the sauce.  Not only is it incredibly delicious, but it is pretty versatile.  I made it once as a dipping sauce for chicken strips to take over to fight night at a friend's place.  I have also used it for veggies.  Both were an absolute hit.

If you make any changes, I would love to hear about them.  What would you do differently?

Thursday, October 13, 2011

Ten Apples Up on Top Part 2


So, as I said in my last post I got a TON of apples this last weekend and looking for some new recipes to try. Well, I made up a porky chop recipe (I know it's nothing new and exciting but I'm not very creative right now). I am calling my creation UNSTUFFED PORKY CHOPS! Yeah, I know real creative.


WHATCHA NEED:
some pork chops (I used 2 boneless)
1 box of pork flavored Stove Top Stuffing (cook it up as directed)
2 small apples, sliced (I used Gala, but I bet it would be awesome with Granny Smiths)
1/3 cup of applesauce
Preheat over to 425 degrees.
Place the sliced apples on the bottom of a small casserole dish. In the prepared stuffing, mix in the applesauce, then place in casserole dish on top of apples. Afterwards place pork chops on, cover with foil and bake for 30 minutes or until the pork chops are finished. Serve and ENJOY!!! I served mine with green beans and my hubby gobbled it right up!!!
Next, I did make that wonderfully delicous apple cake. OMG!!! The smell that went through my home was AHHH-mazing!!!


Whatcha need:
1- 16 oz bottle of ice cream carmel topping
1/2 cup of chopped pecans (I got to use the pecans that came off the tree in my front yard!! YUM!), you can use walnuts too
2 large baking apples, sliced thinly
1 box of yellow cake mix (I prefer Betty Crocker SuperMoist)
1 1/4 cup of water
3 eggs
1/3 cup of veg oil (you can use apple sauce instead)
Preheat oven to 350 degrees.
Put the carmel topping in the bottom of a 13x9 casserole, then put nuts in next, then your sliced apples. Mix the cake mix with the eggs, oil, and water. Pour on top of apples carefully. Bake for 40-45 minutes. Cool in pan for 1 minute then, like a pineapple upside down cake, remove from pan. Can be served with whipped cream or vanilla ice cream.
This will be eaten quickly because it is delish!!!

Thursday, September 29, 2011

So many projects...do I really need a job?

I love to knit and bake!  I really love being able to take a ball of string or a mess of ingredients, play with it and have something useful, pretty, and delicious come out later.  I would be incredibly happy if I could knit, bake, and read all day, I think.

I don't even have to keep the fruits of my labors.  In fact, it really fulfills me to be able to make something for a friend's birthday or when they are feeling down.  My desire to give gifts, I believe, comes from my mother.  She has always been really good at picking out just the right thing for an occasion.  She loves to shop and scour the earth for that "one thing".  I, on the other hand, really didn't catch the shopping bug, but that doesn't stop me from finding that perfect thing.  I just take a different route.  There is nothing like a hand made gift: something that you put a bit of yourself into.  Please don't take this wrong, I don't make gifts to toot my horn and make it about me, but seeing someone wear or enjoy something that I have worked so hard on just for them gives me the best feeling inside. There aren't enough "thanks" in the world to compare with getting to see my friend being warmed by the hat I knitted for her or smiling after biting into one of my cookies after a rough day.

Because of this desire to make everyone in my life happy and comfy, I have found many, MANY ideas, patterns, and recipes that I am just dying to try.  The problem is, I don't have enough time to make all the things I have on my wishlist!  I am in the beginning stages of Project ADD, I think.  I hope it isn't serious, but I find myself wanting to start all of my wishlist at once.  I have been doing OK, keeping myself to only a couple knitting projects at a time, but it has been a difficult road.


As I have quite a bit of spare surfing time at work, I often find myself on pattern sites and recipe sites.  There are oodles of patterns and recipes that I have set aside for "next time".  I remember my dad saying that if my grandmother had a biography it would be called, "Recipes Clipped, But Never Made".  I can sympathize with that.  There are tons of recipes and patterns out there just waiting for my little hands to attempt.


Previous posts have touched upon John's scarf and PW's Christmas (which, with all the mentions between here and on facebook, is starting to tug at her to know what it is).  I told myself that I couldn't start anything else until I "caught up" on the scarf.  "Caught up" should really have a more concrete meaning to me.  Apparently, at the time, it meant, "Go to the yarn store, even though you are nowhere near finished with your current project. That way you can look at all that beautiful bamboo goodness and torture yourself until you start the project anyway."

And guess what I did. Yep, I started that project for PW four days later.  Hey, I did wait four days.  It is turning out beautifully, though.  The stitch pattern is lovely, simple and it isn't terribly hard, once you get the hang of it, and the yarn is gorgeous and there is a ton of love going into this thing.

BUT I guess, I am just not satisfied with working on those two projects.  I have a scarf in the works (at work, shhh) and a bag of yarn by my bed.  I keep thinking it is time to start hats for winter.  All my little nieces and nephews need to stay warm outside, right?!

The problem doesn't end with knitting though, I also have a cooking and baking problem.  That is something I have always enjoyed and have been pretty good at.  Unfortunately, my baking has suffered badly over the summer (which has made my zeal for recipes even stronger).  I just didn't have time or energy to cook much at all.  As I am rectifying that, John and I decided to get back on the more healthy track.  Meaning: cut back on the sweets!  To my dismay, a batch of cookies or a weekly cake is not quite in our diets.  Not like it used to be.  I am not complaining about the positive change in our lifestyle, but I do miss the act of baking and the excitement I see on the boys' faces when they come home and see what is on the counter waiting for them.  I need to realize that baking doesn't equal dessert.  Homemade breads, rolls, muffins... They are all yummy and BAKED.  It is just a matter of changing my perspective.

I have been looking at a recipe for black bean brownies for months.  Delicious, lower in fat and calories, and full of fiber.  It sits on my counter beckoning me to take the leap and just make them.  I vow to have a report on these within the next couple of weeks.  I have high hopes.  I will not be disappointed.
Wednesday, September 28, 2011

Making Up Dishes

So, this week has flown by, yet again. I have been pretty busy. I have been helping my husband out at the University (he works at the University of West Alabama), cleaning house (I have family coming this weekend), and finally I had been talking to the grad school at UWA, I am going to go back to school and get the my Master's in Library Sciences!!! But that's not what you are here for, you are here for the food!!! And today I have a doozy!!! Anthony loved it that he licked his plate cleaned.
EEK!!!! MY POWER JUST WENT OUT IN THE MIDDLE OF THIS LOST HALF OF IT... GRRRRR.....
I call it Creamy Chicken and Rice. Super easy, cheap and yummy!!
Stuff you need:
  • about a pound of boneless, skinless chicken breast, cubed
  • 1 small onion diced
  • a carton of sliced fresh mushrooms (if desired)
  • 1 can of cream of chicken soup (I prefer Campbell's)
  • 1 can of cream of mushroom soup
  • 1 cup of milk ( I put half in the cream of chick can and the other half in the cream of mushroom can)
  • 1 1/2 cup of sour cream
  • salt and pepper
  • Rice (cooked)

How-to:

  1. Brown chicken in skillet, add onions and mushrooms when chicken is almost done.
  2. Add soups and milk, until warm, then add sour cream.
  3. serve over rice, with your favorite veggies!!!

It's even great the next day!!!

Monday, September 26, 2011

Tastiness

So yesterday as I was cleaning out my freezer looking for some bagels, I found a turkey.  So I decided to cook it today.  It is killing me!  As I sit here writing, all I can smell is garlic and turkey goodness.  OH MY! There may not be enough left to give the boys after I carve into this things.  I am not real experienced in cooking turkeys.  In fact, this is my second ever.  It is so much easier than I thought it would be.

I made the mushroom meatballs that Tiff suggested the other day. It was so good!  I did end up cheating, though, I used pre-made meatballs that I had on hand.  They weren't nearly as good as homemade, but they worked on a busy weekday evening.  I will definitely make this dish again, but put more effort into it and make the meatballs myself.

Here is the recipe, for anyone out there needing to make dinner tonight.

Meatballs and Mushroom Gravy

Ingredients
  • 1 1/4 pounds lean ground beef
  • 1 egg, lightly beaten
  • 1/3 cup unseasoned bread crumbs
  • 1/2 teaspoon garlic salt
  • 1 teaspoon Italian seasoning
  • 1/2 teaspoon black pepper
  • 1 tablespoon olive oil
  • 1 small onion, halved and thinly sliced
  • 1 cup sliced mushrooms
  • 2 tablespoons all-purpose flour
  • 1 ounce can beef broth
  • 1/4 teaspoon ground nutmeg
Make It1. Heat oven to 350 degrees F. Place a rack on a baking sheet and coat with nonstick cooking spray.
2. In a large bowl, mix ground beef, egg, bread crumbs, garlic salt, 1/2 teaspoon of the Italian seasoning and 1/4 teaspoon of the black pepper. Form into 40 meatballs, about 1 level tablespoon each. Place on prepared rack over baking sheet.
3. Bake meatballs at 350 degrees F for 20 minutes.
4. Meanwhile, heat olive oil in a large nonstick skillet over medium-high heat. Add onion and mushrooms and cook 6 to 7 minutes, stirring occasionally or until lightly browned. Sprinkle flour over the mixture, stir and cook 1 minute. Gradually stir in beef broth until the flour is completely incorporated into the liquid. Bring to a simmer. Stir in the remaining 1/2 teaspoon Italian seasoning, 1/4 teaspoon pepper and the nutmeg.
5. Add meatballs to the skillet and reduce heat to medium-low. Cover and simmer for 10 minutes, stirring occasionally. Serve with buttered egg noodles.  Enjoy!


Thursday, September 15, 2011

John's Scarf

So I started this project in January.  It was supposed to be for my husbot's Christmas present, but I "saved the best for last".  I knitted scarves for all my besties and his was the bestiest and the most difficult.  I have never tried intarsia before.  It is possible I bit off more than I could chew, but a little perseverance and a lot of making things up as I go, I eeked it out.  I may have been better starting with a smaller, less complicated project to learn on, but this is the one he picked out.

My goal is to finish the entire project before November.  I hope that I can do it.  I think I can...I think I can...


This is the hardest part. Hopefully *gulp!
The back!  Now I have to weave them all in.  Ugh!
Once I get further on this project, I have my sister's Christmas project all picked out.  I found the pattern on ravelry.com (love that place), and I think it is perfect for her.  I made the mistake of going yarn shopping for it and now I am so antsy to start.  Maybe that will help the progress of the previous.

The yarn.  Bamboo and cotton.  So soft and comfy!